
Displaying Data with Templates in ISML
Introduction
ISML stands for Internet Store Markup Language. These files have the .isml extension and they define how data, tags, and page markup are transformed into HTML that is sent to the browser, using Cascading Style Sheets (CSS) for page layout and styling.
Salesforce Commerce Cloud Digital uses templates to generate dynamic HTML-based web pages for responses sent back to the client.
First, let's get you started by understanding what you can do with ISML, then we will take a short tour on how ISML templates are organized on our site and finally how do we do to avoid hardcoding text strings that become visible to the user.
pdict keys | Alternatives |
|---|---|
CurrentSession | TopLevel.global.session |
CurrentRequest | TopLevel.global.request |
CurrentCustomer | TopLevel.global.customer |
CurrentHttpParameterMap | TopLevel.global.request.httpParameterMap |
CurrentPageMetaData | TopLevel.global.request.pageMetaData |
CurrentForms | TopLevel.global.session.forms |
pdict is a hashmap on which key, object pairs can be loaded on the frontend. However, there are some built-in pdict keys (variables) that provide access to the most commonly used objects, such as session and request.
This means that any data that you send from the backend to the frontend, doesn't matter if using res.render or res.setViewData, on the frontend, they will be loaded inside the pdict variable.
ISML expressions provide access to data by using dot notation. This example accesses a property of the Product object in the pipeline dictionary: ${pdict.varName}
JavaScript controllers can use alternatives to pdict keys. The table on the left shows some of them.
In other words, controllers have access to request, response, session, customer objects just like you have on the frontend using pdict. You just need to use the valid import or require statements.
ISML Tags and Expressions
ISML tags are Commerce Cloud proprietary extensions to HTML that developers use inside ISML templates. ISML tags and expressions can only be written in ISML templates.
ISML tags always start with is, e.g. <isprint> and describe, together with regular HTML, how dynamic data will be embedded and formatted on the page.
Depending on their tasks, ISML tags can be divided into the following groups as shown in the table below.
Group | Tags | Purpose |
|---|---|---|
HTTP-related | <iscookie> | Sets cookies in the browser |
<iscontent> | Sets the MIME type | |
<isredirect> | Redirects browsers to specific URLs | |
Flow Control | <isif> | Evaluates a condition |
<iselse>, <iselseif> | Alternative logic | |
<isloop> | Creates a loop statement | |
Variable-related | <isset> | Creates a variable |
<isremove> | Removes a variable | |
Include | <isinclude> | Includes a template |
Scripting | <isscript> | Allows Digital Script execution |
ISML Expressions
ISML Expressions are based on the Digital Script language. Since Digital Script implements the ECMAScript standard, access to variables, methods, and objects is the same as using JavaScript.
ISML expressions are embedded inside ${...} to enable the ISML processor to interpret the expression prior to executing an ISML tag or the rest of the page.
ISML expressions can also access Digital Script classes and methods. Two packages are available implicitly in ISML, so classes do not need to be fully qualified:
TopLevel package: session.getCustomer()
dw.web package: URLUtils.url(), URLUtils.webRoot()
TopLevel package has a class named global which is implied so doesn't need to be in the prefix. Other access to classes and methods must be fully qualified: ${dw.system.Site.getCurrent().getName()}
Examples of ISML expressions:
${TopLevel.global.session.getCustomer().getProfile().getLastName()}
Since TopLevel package and global class are implicit, the previous code is equivalent to the following code: ${session.getCustomer().getProfile().getLastName()}
You can replace the get method with properties. So the previous code example is equivalent to the following code:
${session.customer.profile.lastName}
${pdict.CurrentSession.customer.profile.lastName}
${pdict.CurrentCustomer.profile.lastName}
${dw.system.Site.getCurrent().getName()}
${dw.system.Site.current.name}
ISML expressions also allow complex arithmetical, boolean, and string operations: ${pdict.myProduct.getLongDescription() != null}
ISML Tags
In this section we will cover the most frequently used tags: <isprint>, <isset>, <isinclude> <isdecorate>, <isloop> and the conditional tags <isif>, <iselseif>, and <iselse>.
Although there are some ISML tags that do not need a corresponding closing </> tag (i.e.: the <isslot> tag), it is best practice to always use a closing tag.
Printing variables within the page
Type | Description |
|---|---|
MONEY_LONG | Prints money with currency symbol e.g. $3,333.00 |
MONEY_SHORT | Prints money without the symbol e.g. 3,333.00 |
DECIMAL | Prints the value with two decimal places e.g. 3,455.35 |
INTEGER | Rounds off and prints only the integer portion e.g. 3,455 |
DATE_LONG | Prints date in the long format like Jul 24, 2016 |
DATE_SHORT | Prints date in the short format like 07/24/2016 |
The <isprint> tag can print the formatted output of a variable or an expression to the browser. In order to do so, it uses built-in styles or formatters. You can see the documentation for formatters. Examples using isprint with styles:
<isprint value="${myMoney}" style="MONEY_LONG>/>
<isprint value="${myMoney}" style="MONEY_SHORT>/>
<isprint value="${myNumber}" style="DECIMAL>/>
<isprint value="${myNumber}" style="INTEGER>/>
<isprint value="${new Date()}" style="DATE_LONG>/>
<isprint value="${new Date()}" style="DATE_SHORT>/>
<isprint value="${myString}" encoding="off>/>
Creating and Accessing Variables
You can create and access your own custom variables in an ISML template by using the <isset> tag.
When using the <isset> tag, name and value are required attributes that must be assigned. The default scope is the session, so you must be careful to qualify your variables accordingly if you do not want them.
Example: <isset name = "<name>" value = "<expression>" scope = "session"|"request"|"page">
Value attribute:The value attribute from the isset tag can be a hardcoded string or number, or an ISML expression accessing another variable or object.
Value Type | Example |
|---|---|
String | value="hardcoded text" |
Expression | value="${pdict.myProduct.name}" |
Scope Attribute: An <isset> variable's scope attribute refers to its accessibility levels, such as session, request, and page. It is important to understand the scopes of a variable and which objects can access that variable at each level. Listed are the scopes from the widest to narrowest access.
Scope | Definition |
|---|---|
session | Available through the whole customer session, even across multiple requests. Any variable added to the session scope becomes a custom attribute of the session object. Since it is not a standard attribute it must be accessed with the session.custom qualifier: ${session.custom.myVar} |
request | variables are available for the current internal Salesforce B2C Commerce request. The request variable isn't available for multiple requests, so it isn't available after an interaction continue node. |
page | Available only for a specific ISML page, and its locally included pages. Their scope is limited to the current template and any locally included templates. They are accessed without a prefix: ${pageVar} |
Here are some examples of using isset tag and retrieving the variables back from the scope session scope:
<isset name="x" value="12343" scope="session"/>
<isset name="x" value="${12343}" scope="session"/>
<iscomment> Session is implied here </iscomment>
<isset name="x" value="12343" />
Retrieving from session: ${session.custom.x} | ${pdict.CurrentSession.custom.x}
Request Scope: ${request.custom.x} | ${pdict.CurrentRequest.custom.x}
Page Scope: ${x}
More information about <isset> tag can be found here.
Reusing Code in Templates
Reusable code saves time in both code creation and updates. It also reduces errors and helps to ensure a consistent look and feel.
You can use the following tags to reuse code in ISML templates:
Tag | Description |
|---|---|
<isinclude> | Embeds an ISML template |
<isdecorate> | Uses a decorator template |
<ismodule> | Defines custom ISML tags |
<iscomponent> | Invokes a remote include |
Local include syntax: <isinclude template="[directory/]templatename"/> (You do not need to add the .isml extension when including a template)
Remote Include syntax: <isinclude url="${URLUtils.https('controller_url')}"/>
Here some examples:
<isinclude template="extras/calendar"/> (Local include)
<isinclude url="${URLUtils.url('ConsentTracking-Check')}"/> (Remote include)
In this example, the dw.web.URLUtils.url() method builds a site-specific URL for the ConsentTracking-Check controller. Never hard-code a controller URL since it would contain a specific server in it. Use methods from URLUtils instead.
Passing URL parameters: To pass parameters to your controller, you use the following syntax:
<isinclude url="${URLUtils.https('controller_url', <parameterId_1>, <parameterValue_1>, .. <parameterId_n>, <parameterValue_n>)"/>
Finally, you could also implement a remote include, via the <iscomponent> tag. It also supports passing multiple attributes.
<iscomponent
pipeline = <string> | <expression> [locale = <string> | <expression> ]
[any number of additional arbitrarily named parameters]
/>
In practice, this tag is not being used anywhere in SFRA. We are using <isinclude> instead.This tag is similar to a remote include. However, it uses pipeline-related attributes to specify the content generating target and allows for arbitrary attributes.
Technically, the <iscomponent/> tag performs the same function as a remote include. The use of remote includes, however, might not be obvious. The tag, with its direct association to a pipeline, makes its purpose obvious. It's intended to embed reusable functionality, encapsulated in a pipeline, into another template. It also lets the embedded component have a different caching policy than the included page.
Reusing Page Layouts
One very cool feature that ISML offers us is the possibility to create page layouts and reuse those layouts on any pages we want so that we avoid creating pages from scratch every single time.
Also, it makes maintenance much simpler because if we need to fix anything on the page, including SCSS or javascript imports, we just need to fix the page layout being used and it will be reflected to all pages using it.
To these page layouts, we give the name decorator template and make use of them we use the <isdecorate> tag.
These files are kept in a specific folder app_storefront_base/cartridge/templates/default/common/layout
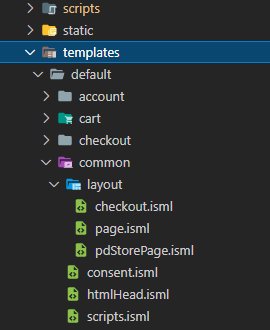
The decorator template uses <isreplace/> to identify where to include the decorated content. The following example shows a decorator and the area where the code is being replaced by whatever template that uses the decorator.
A typical use case is to decorate the content body with a header and footer. See the app_storefront_base/cartridge/templates/default/common/layout/page.isml file for example:
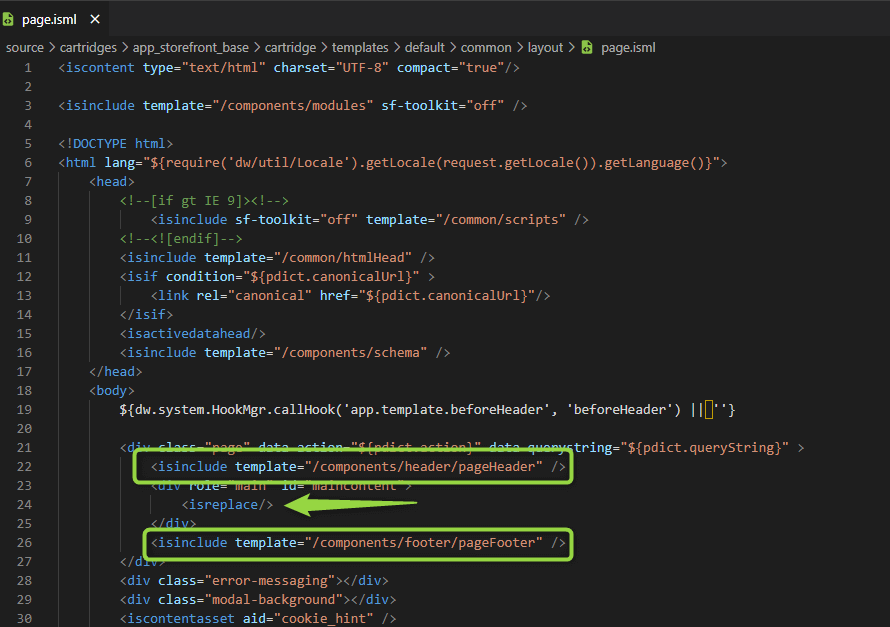
Typically, the decorator template only uses one tag, <isreplace/>. However, you can use multiple tags. If the decorator template uses multiple <isreplace/> tags, the content to be decorated will be included for each <isreplace/> tag.
See the example below where we have the homepage using our a decorator:
<isdecorate template="common/layout/page" />
Conditional Statements
Most programming languages use the keywords if, else if, and else for conditional statements. Commerce Cloud Digital uses similar keywords but adds the is prefix to the beginning of the syntax:
<isif condition="${ISML expression evaluated}">
     Do something here if true.
<iselseif condition="${check another condition}">
     Do something if this one is true.
<iselse>
     If none of the above conditions are true, do this.
</isif>
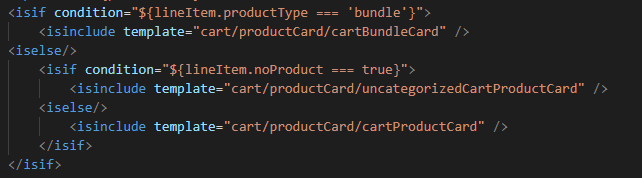
To use a conditional statement in an ISML template:
Determine the location on your ISML page where you want to write your conditional statement.
Open your conditional statement with the <isif condition=""> tag. Example:
Loops
With the <isloop> tag you can loop through the elements of a specified collection or array.
For example, you can list data such as: categories, products, shipping, and payment methods. You can even nest <isloop> statements (put one inside another). You can use the following supporting tags with <isloop>:
Use the <isbreak> tag within a loop to terminate a loop unconditionally. If used in a nested loop, it terminates only the inner loop.
Use <isnext> to jump forward within a loop to the next list element of an iterator. This tag affects only the iterator of the inner loop. If an iterator has already reached its last element, or an iterator is empty when an <isnext> is processed, the loop is terminated instantly.
The full syntax for using the <isloop> tag is:
<isloop
iterator|items = "<expression>" [ alias|var = "<var name>" ]
[ status = "<var name>" ] [ begin = "<expression>" ] [ end = "<expression>" ]
[ step = "<expression>" ]>
... do something in the loop using <var_name>…
</isloop>
The attributes have the following usage:
Attribute | Description |
|---|---|
items (iterator) | The expression returning an object to iterate over. Attributes iterator and items can be used interchangeably. |
var (alias) | Name of the variable referencing the object in the iterative collection referenced in the current iteration. |
status | Name of the variable name referencing loop status object. The loop status is used to query information such as the counter or whether it is the first item. |
begin | The expression specifying a begin index for the loop. If the begin is greater than 0, the skips the first x items and starts looping at the begin index. If begin is smaller than 0, the is skipped. |
end | The expression specifying an end index (inclusive). If the end is smaller than begin, the is skipped. |
step | The expression specifying the step used to increase the index. If the step is smaller than 1, 1 is used as the step value. |
For example, if the <isloop> tag declares a status="loopstate" variable, then it is possible to determine the first time the loop executes by using: <isif condition="${loopstate.first}">. Another example of <isloop> tag is:

For the status variable, the following properties are accessible:
Attribute | Description |
|---|---|
count | The number of iterations, starting with 1. |
index | The current index into the set of items, while iterating. |
first | True, if this is the first item while iterating (count == 1). |
last | True, if this is the last item while iterating. |
odd | True, if the count is an odd value. |
even | True, if the count is an even value. |
Creating custom tags with <ismodule>
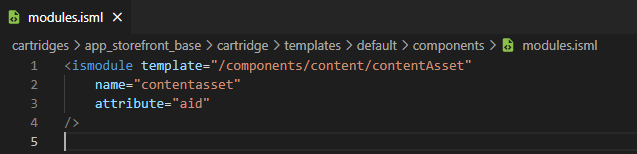
There are three key ISML files required for creating and using a custom tag:
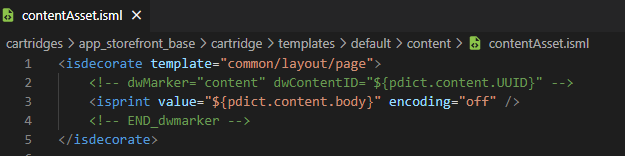
The ISML file which sets the values of any attributes of the custom tag. (modules.isml)
In the template attribute, you specify the ISML file which defines what happens when the attributes are passed. See the contents of app_storefront_base cartridge templates default components content contentAsset.isml
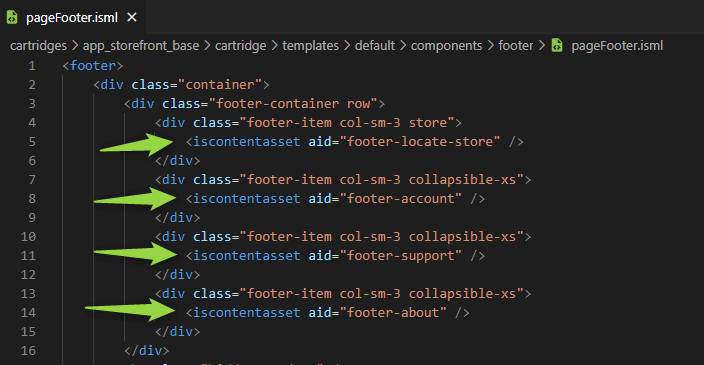
And this is how you Invoke the custom tag inside an ISML template pageFooter.isml
Resource Bundles
In storefront code, we should avoid hard-coding text strings. Titles, labels, messages, buttons and field names should all be externalized by using resource bundles (a.k.a. properties files).
If you do not want to duplicate ISML templates in order to create locale-specific templates, you can use resource bundles to keep your template generic and reusable.
A resource bundle is a file with a .properties extension that contains the hardcoded strings to be used in ISML templates. In SFRA bundles are loosely named by the functional area where the strings are used, but you can use any file name and organization you want.
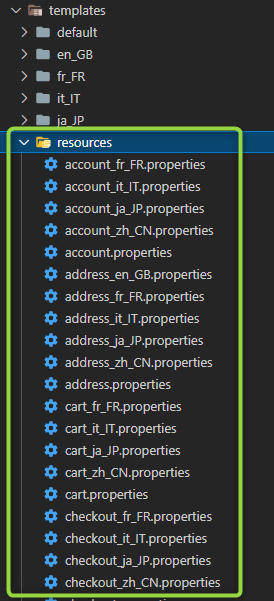
By default, they are located always at <cartridge_name>cartridgetemplatesresources
The resource bundles contain key=value pairs, where the key might be compound (key.subkey) and the value, is a hard-coded string that uses Java MessageFormat syntax to implement parameter replacement.
Strings from the bundles are accessible to all ISML templates through 2 methods from the API:
Resource.msg: Use it when you only need to retrieve a value
Resource.msgf: Use it when you need to retrieve a value passing a parameter will replace a placeholder (e.g {0}) in there
More information can be found here.
See some examples on how to define these key=value pairs and how to use them.
Did you notice that some have values like {0} and {1}? These are placeholders that will be dinamically replaced by parameters you pass when using Resource.msgf.
After the 3rd parameter, you can pass any number of values you want as a parameter and inside the resource bundle, they will be identified by {}, starting from 0 and incrementing by 1 for each extra parameter you pass.
That's the biggest difference between both methods. One only retrieved hard-coded strings that don't accept parameters, the other accepts parameters.
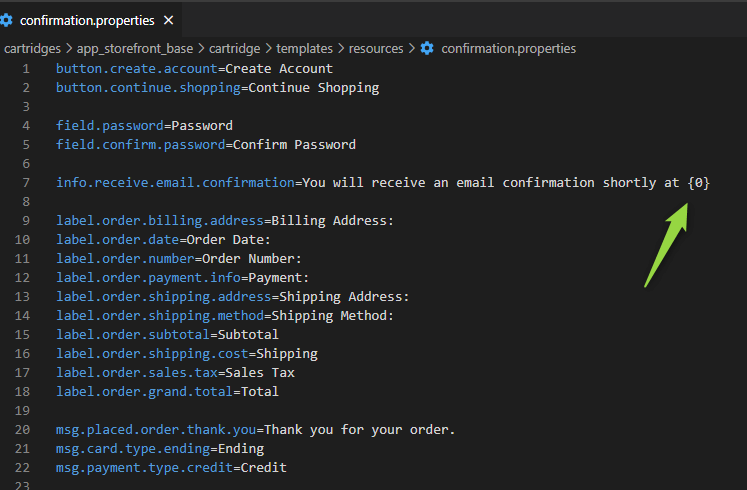
Use the Resource.msgf to replace these placeholder.

Localization
You might be wondering: Ok, but what do we do when we need the site to support multiple languages or when the site must look different for different countries/languages?
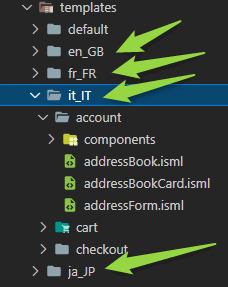
For templates, you will create a folder with the country_language code and replicate the subfolders and files from the default folder.
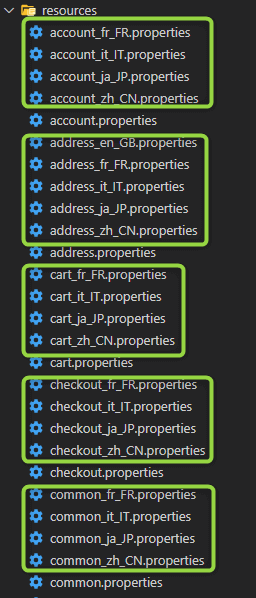
For Resource Bundles, you will append the country_language code to the name of the file and add the translations to each corresponding file:
Practical Exercises
📝 Exercise: Create an ISML Template
On Visual Studio Code, right-click the templates' folder where you want to create your ISML file and chose New File
Give your file a name + the .isml extension and press ENTER
📝 Exercise: Set and Retrieve Variables
Create a new controller called VarTest
Create a new ISML template called vartest.
In the template, create a new variable called sessionVar with hardcoded text as the value, set its scope as session and print the value to the page:
<isset name="sessionVar" value="${1}" scope = "session"/>Display the contents of the sessionVar variable. Its value is: ${session.custom.sessionVar}
Open a web browser and test the controller.
Add similar examples using different scopes (request and page) to the vartest template and display them.
Modify the examples using boolean and string values (i.e., "${false}" and "Hello").
Test the JavaScript controller again to see the new variable values.
Increment the variables using the following syntax: "${request.custom.requestVar + 1}"
Please pay attention to the fact that when you create both Request and Session variables you need to add request.custom.<name> or session.custom.<name> to access the variable. Page variables, on the other hand, can be accessed directly by their name.
📝 Exercise: Use Local Includes
Study the template to include
Locate and study the productTile.isml template.
Notice that the first <isset> tag expects pdict.product in the pipeline dictionary.
Include productTile.isml in your current template
Create a new controller called ShowProduct with one endpoint where you will retrieve any product using the class ProductMgr
Send your product to your template
Open the productfound.isml template.
Create a new variable named product that receives as value your product being sent from the template: <isset name="product" value="${pdict.myProduct}" scope="request"/>
Test the JavaScript controller with an existing product: your_storefront_url>/ShowProduct-Start?pid=P0048M
📝 Exercise: Use Remote Includes
Create 2 endpoints in your controller named: RenderTemplate and TestRemoteInclude
Create a new ISML template with any dummy text
In the RenderTemplate endpoint, just render this template
Create a 2nd ISML template and use a remote include to call your RenderTemplate Controller endpoint
In the TestRemoteInclude endpoint, render your 2nd template
On your storefront site URL, call your TestRemoteInclude endpoint
📝 Exercise: Use a Decorator
On Visual Studio Code, using the Search function, locate the common/layout/page/isml template. Notice the different areas of the page this decorator defines.
Locate the tag.
Open the controller that you created in the previous exercise and create a new endpoint called TestDecorator
Create a new ISML template to be rendered by this new endpoint
Inside your ISML template add the following:
<isdecorate template="common/layout/page">
..existing content..
</isdecorate>Test the endpoint
📝 Exercise: Bonus Track
Use a Custom Tag
Creating a Basket JavaScript Controller and Using a Loop in ISML
Using Resource Bundles
SFRA Course
Displaying Data with Templates


JONATAN JUMBERT
Find Me Everywhere
