
System and Custom Objects. SFCC B2C Site Preferences
Introduction
We are going to learn about 2 important SFCC features, which allow us to persist and retrieve data from Business Manager. The first one is called Objects and we have 2 types: System and Custom. The second one is called Site Preferences.
Objects
How do you think that Business Manager stores Products, Catalogs or Categories? How does the API work with them?
Previously you were working with Controllers, calling some classes from the SFCC API to get data back from your Business Manager. These objects that you are manipulating are actually stored in Business Managers as tables.
System Objects
The first type of object that can be saved into Business Manager is called System Object. To begin with, do you know are they called System objects? It's simpler than you have been thinking: they come already out-of-the-box when you receive your sandbox.
System Object Types
Let's have a look at the system objects that we are provided out-of-the-box: Go to Administration > Development > System Objects Types
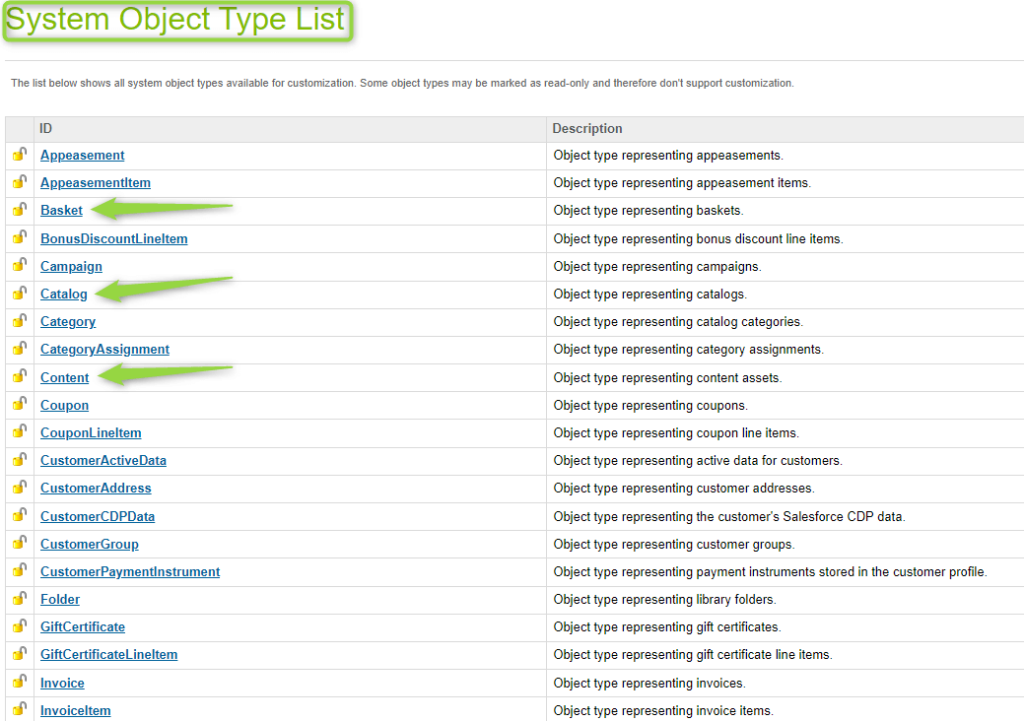
System Object Types list
Do you recognize the items pointed by the green arrows? They are some of the system object we have been working on previous chapters.
Check System Object Fields
Go to Administration > Development > System Objects Types
Click on the Product item
Click on the Attribute Definitions tab
At the bottom, click to Show All
As you can see, the Product Object has almost 100 fields! But as far as we remember, we did not see that many fields when we were editing products a few modules ago. So what is going on?
Although your objects can many fields, to avoid polluting the screen we can limit which fields will be displayed when we create/edit an instance of that object. If you go back to the check any Product, you will notice that not even have of the fields we just saw are listed there.
So how do we decide which fields are displayed?
Check which fields are displayed in the Edit Page
Go to Administration > Development > System Objects Types
Click on the Product item
Click on the Attribute Grouping tab
Check the names in the Name column: In the Attributes column, you will see a number per row. That number means the number of fields inside that grouping.
Click on the number related to Search Engine Optimization Support: You will see 4 fields listed:Page Title, Page Description, Page Keywords, and Page URL
Now open any product and check if these same fields are listed under the Search Engine Optimization Support set.
As you can see, this way we can customize all objects pages to show the fields that we want to and hide everything else that we don't think it is necessary for that project.
One last important detail, as we mentioned at the beginning of this module that System Objects come out-of-the-box with your Business Manager. Which means you can't create new System Objects Types. If you want a new type of Object, then we should see Custom Objects.
Custom Objects
Custom objects enable you to extend the Salesforce B2C Commerce model to suit your business needs. They are basically a new table in the database where you specify the primary key and storage attributes (columns) that suit your business needs.
Custom Objects Creation
An example of Custom Object usage is a newsletter. Customers can sign up for it, but the platform does not have a system able to support it.
These subscriptions are intended for export since the platform should not be used for mass mailing campaigns. It is tempting to add the subscription data to the Profile system object, but this would imply that only registered users would be able to sign up.
To enable anyone to get a newsletter, you need to define a Custom Object to represent it.
This Newsletter Custom Object should not be replicable since subscriptions created in staging should not be copied to Production. But depending on the situation you want your Custom Object to be replicable.
You also need to consider how to clean up Custom Objects once they have been exported or after a certain expiration period. This means the creation of a cleanup batch job that should run on a schedule. You can either create custom objects using Business Manager or programmatically.
You use two Business Manager modules to define and manage your custom objects:
Custom Object Definitions: facilitates naming, primary key, and column specification. It is located in Administration > Site Development
Custom Object Editor: facilitates instance creation and editing. It is located in Site - <site> > Custom Objects > Custom Object Editor
Before you can create a custom object instance you must first define the custom object data type in Business Manager.
Custom Objects can also store configuration parameters to integrate with external systems, avoiding the need to create multiple Site Preferences. These Custom Objects need to be replicable if the settings made in Staging are suitable for Production.
Using Script API to Create Custom Object Instances
Salesforce B2C Commerce Cloud Script API provides the following classes in the dw.object package, among others:
CustomAttributes: attributes defined by a user in Business Manager to extend a system object or Custom Object. Accessible via the syntax: <instancename>.custom.<attributename>.
CustomObject: represents an instance of a Custom Object.
CustomObjectMgr: enables Custom Object instance creation, retrieval, deletion, and searching.
PersistentObject: enables persistent storage.
ExtensibleObject: enables custom attributes to be added.
Custom Objects persist in the database. Objects of these class types are saved in the database and can be extended to store extra attributes.
The following use of the CustomObjectMgr class enables the creation of an instance of Custom Objects by providing the Custom Object type and the primary key:
CustomObjectMgr.createCustomObject("NewsletterSubscription", UUIDUtils.createUUID());
The code above creates an instance with a system-generated, unique Primary Key.
You could also use any other unique value such as an email sent by the form submission. If the value is not unique, a duplicate PK error occurs.
Before creating Custom Object's instances with IDs that are not system-generated, it is a good practice to always check if an instance with the value you want to use as PK doesn't exist already.
📝 Exercise: Creating a New Custom Object Type Using Business Manager
Select Administration → Site Development → Custom Object Types.
Click New to create a new Custom Object type.
Fill in the required fields for the Custom Object type:
ID: the unique ID of the object type. It cannot contain spaces.
Key Attribute: This is the unique key for the custom object type.
Data Replication: Specify whether the custom object type data will be replicable to other instances.
Storage Scope: Specify whether the custom object type will be available for a site or for the entire organization.
Click Apply. The Attribute Definitions and Attribute Grouping tabs become available.
Click the Attribute Definitions tab. Notice the default values created with your Custom Object type. These values cannot be changed once they are created.
When you are finished adding attribute definitions, create an Attribute Group. Click the Attribute Grouping tab.
In the ID field, enter a name for your grouping. In the Name field, enter a name. Click Add.
Add field attributes to the group. Click the Edit link.
To the right of the ID field, click the ellipses to select field attributes.
Select the attributes you wish to add from the list by clicking on the checkbox next to each one. Click Select.
Storage Scope and Replication
One thing that we did not discuss in the System Objects section was Scope because it was not necessary at that point, but now is the moment for you to know about it.
Let's first define what is scope. Consider Scope as the visibility of the object. Who or what can see and use it. We have here 2 options: Organization or Site
It means that Custom Objects can be created to be visible to all storefronts (Organization) or just for a specific Storefront (Site) in your sandbox. It will really depend on your project.
The Custom Object type itself is always available to the entire organization. Also, you can specify if you want Custom Object instances to be replicable.
Transactions
Where you work with objects, be them System or Custom ones, there is one essential detail you must be aware of. You can retrieve objects as much as you want, but when you want to create, edit or delete an object, things are different.
A transaction provides a context for performing atomic changes to persistent business objects. Before a business object can be created, changed, or deleted, a transaction must be started and changes on the touched business objects will only be made durable when the transaction is committed.
Keep that in mind whenever you need to create, change or delete an object instance, you will need a transaction.
Transaction.wrap(() => {
   ...
}
Transaction Types
We can have 2 types of transactions: Implicit and Explicit.
Implicit: It's the example we used above. You just define the code that will be inside the transaction but without actually writing any begin or commit commands. If anything fails, the transaction will be rolled back automatically and the changes will be undone.
Explicit: On this type of transaction, you are the one responsible for defining where the transaction begins and ends.
Here you can find examples of Implicit and Explicit Transactions:
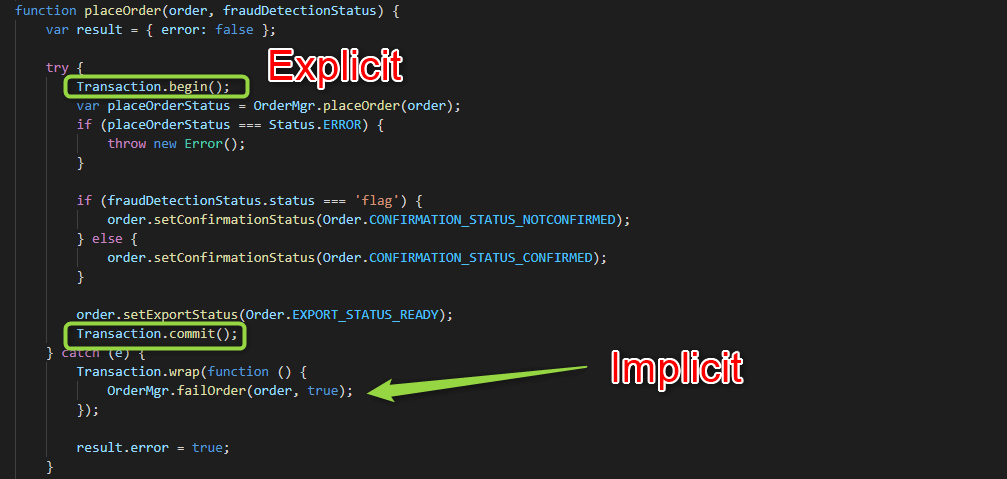
Implicit and Explicit Transactions
Site Preferences
Site Preferences are another way to store and retrieve data from your sandbox and, in fact, are one of the System Object Types.
Check Site Preferences Fields
Go to Administration > Development > System Objects Types
Click on the Site Preferences item
Click on the Attribute Definitions tab and have a look at the fields
Click on the Attribute Grouping tab and have a look at the groups that are defined.
As you can see, it has many fields. A lot of things are saved as SitePreferences. Like you did with the Product System Object, try to create a new field for this object.
Adding Value to SitePreferences Fields
Go to Merchant Tools > Site Preferences > Custom Preferences
You will see that like other System Objects, fields are organized according to the Field Groups we create.
You can either use one of the existing groups or create your own back in the Attribute Grouping tab
Click on the Grouping you want (for example, Storefront Configs)
Now you can see the values stored for each field and modify them if you want
Retrieve Site Preferences in Code
In order to retrieve any Site Preference using code, you only need to know the field's ID and use the following code:
If you are trying to retrieve a Site Preference that was created out-of-the-box with your site:
dw.system.Site.getCurrent().getPreferences().<id_of_the_site_preference>If you are trying to retrieve a Custom Site Preference created by you or your team:
dw.system.Site.getCurrent().getPreferences().custom.<<id_of_the_site_preference>
📝 Exercise: Add a new field to the Product System Object and display it
Go to Administration > Development > System Objects Types
Click on the Product item
Click on the Attribute Definitions tab
Click on New
Input the following values:
ID: sfcclearning_com
Display: New Attribute SFRA Student Guide
Value Type: String
Click Apply
Click on the Attribute Grouping tab. Let's create a new Grouping
At the top of the form New Attribute Group, input the following values:
ID: salesforceb2c_certification_questions_com_group
Name: SFRA Student Guide Grouping
Click Add
If your new group is not being displayed, at the bottom click All
Click on the number in the same row as your new grouping
Right below Assign Attribute Definition, click on the ... button
In the new pop-up, write at least part of the ID of your field in the search field and click Find
Click on the checkbox for your field and click Apply
Click on Back
Now go to any product Edit Page and search for your grouping and your field
SFRA Course
Data with Objects and Site Preferences

JONATAN JUMBERT
Find Me Everywhere
